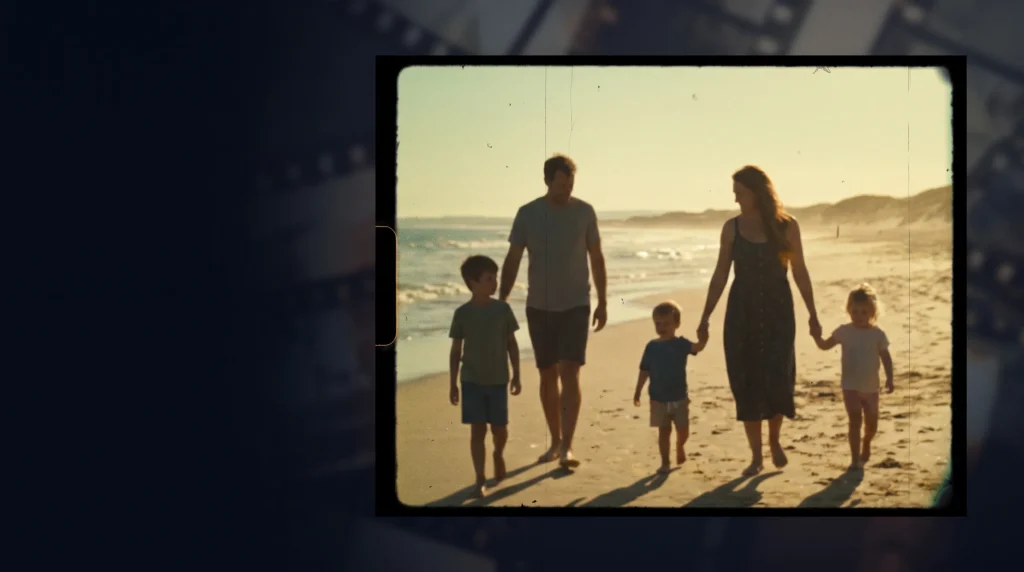
Answer: To make digital video look like 8mm film, use a 4:3 frame, softer detail, strong moving grain, warm or faded color, subtle flicker, gate weave, dust and scratches. For a more authentic Super 8 feel, use lower-motion-smoothness around 12–18 fps and avoid overly stable, perfectly framed shots.[youtube][nofilmschool]
The 8mm look is popular because it feels personal. It can make modern footage feel like a family memory, a travel diary, an old holiday reel or a scene found in an attic.
But grain alone will not create a convincing result.
Real 8mm and Super 8 footage had small film frames, visible texture, imperfect exposure, mechanical movement and a home-movie style that rarely looked polished. The best digital recreation uses those details together while keeping the image watchable.
What Makes 8mm Film Look Different?
8mm film has a distinct look because of its small physical frame and consumer-focused cameras. It often feels rougher and more intimate than 16mm or 35mm film.
A convincing 8mm effect usually includes:
- A 4:3 or narrow frame
- Visible moving grain
- Soft image detail
- Warm, faded or slightly shifted color
- Slight overexposure in highlights
- Uneven brightness or flicker
- Gate weave and frame jitter
- Dust, dirt and occasional scratches
- Light leaks or film burns used sparingly
- Less stable camera movement
- Lower motion smoothness
- A home-movie style of framing
Super 8 cameras commonly shot at lower frame rates, often around 12 to 18 fps, which is one reason the motion can feel less smooth than modern video.[nofilmschool]
Start With the Right Footage
The effect works best when the footage already has a relaxed, observational feel.
Good subjects include:
- Family moments
- Travel scenes
- Outdoor gatherings
- Children and pets
- Road trips
- Beaches and parks
- Weddings
- Summer evenings
- Street scenes
- Friends walking or laughing
- Old buildings
- Everyday details
Avoid footage that looks too polished if possible. A highly stabilized drone shot, clean commercial lighting or extremely sharp 4K close-up can still work, but it may need more work in post-production.
Shoot for an 8mm Look
You can create the effect entirely in post, but shooting choices make the result more believable.
Use Progressive Footage
If your camera supports it, shoot progressive rather than interlaced video.
A progressive image is closer to the frame-by-frame feel associated with film. If you are shooting specifically for an 8mm-style sequence, use a frame rate that gives you a less smooth result, such as 24 fps, 18 fps or a camera’s slow-and-quick setting where available.
Avoid Perfect Stabilization
Modern image stabilization can make footage feel very smooth and controlled. Real home-movie film often has small hand-held movement.
You do not need to shake the camera aggressively. Just avoid making every shot perfectly locked down.
If it fits the project, turn off strong in-camera stabilization and let small natural movement remain. This is commonly recommended when trying to imitate Super 8 footage.[nofilmschool]
Use Deeper Focus
Heavy modern background blur can make footage feel too polished.
For an 8mm-inspired look, keep more of the scene in focus when possible. A smaller aperture, such as f/5.6 or f/8 depending on light and camera, can help create a deeper-focus home-movie feel.[nofilmschool]
Do Not Over-Compose Every Shot
Old home movies often feel spontaneous. The subject may drift slightly out of frame. A shot may start late. The camera may reframe during a moment.
You do not need to make footage careless. But leave some natural imperfection in the framing.
Build the 8mm Look in After Effects
This workflow uses native After Effects tools and optional overlays.
Create Your Composition
- Import your footage.
- Drag it into a new composition.
- Duplicate the footage layer if you want to preserve a clean backup.
- Add adjustment layers for color, grain, flicker and frame-rate changes.
- Keep dust, scratches and light-leak elements on separate layers.
A simple layer stack can look like this:
| Layer | Purpose |
|---|---|
| Film Border | Creates a Super 8-style frame |
| Dust and Scratches | Adds physical-film imperfections |
| Light Leak | Adds occasional color flare or burn |
| Flicker and Gate Weave | Adds brightness and frame movement |
| Grain and Softness | Removes clean digital texture |
| 8mm Color Grade | Adjusts color and contrast |
| Original Footage | Your video source |
Step 1: Use a 4:3 Frame
Many Super 8 references are associated with a 4:3 image shape, although the exact final presentation can vary.
For a classic 4:3 composition, use:
- 1440 x 1080
- 1080 x 810
- 960 x 720
If your project needs to remain 16:9 for YouTube or social media, create a 4:3 image area inside the wider composition.
Create a Simple 4:3 Border
- Keep your main composition at 1920 x 1080.
- Add a black solid above the footage.
- Use the Rectangle Tool to create a centered 4:3 mask.
- Set the mask mode to Subtract.
- Feather the edge very slightly if needed.
This leaves vertical black bars at the sides, known as pillarboxing.
You can also use a rounded film-frame border, but keep it subtle. A very obvious border can make the result look like a template instead of scanned film.
Step 2: Create an 8mm Color Grade
Digital footage often has rich color, deep blacks and clean highlights. Old 8mm film often feels warmer, softer and less technically perfect.
Create an adjustment layer called 8mm Color.
Apply:
Effect > Color Correction > Curves
Try these changes:
- Lift the black point slightly.
- Lower the white point a little.
- Add a small warm shift to highlights.
- Reduce contrast in deep shadows.
- Keep skin tones natural.
Then add:
Effect > Color Correction > Hue/Saturation
Lower saturation by around 10 to 25 points.
For a warm home-movie look, add a subtle yellow or orange cast. For a faded old-reel look, introduce slight green or cyan in shadows.
Starting Color Styles
| Style | Color direction |
|---|---|
| Warm family home movie | Warm yellow highlights, mild saturation reduction |
| Faded summer footage | Soft contrast, warm whites, slightly lifted blacks |
| 1970s-style reel | Muted greens and yellows, low contrast, stronger grain |
| Old winter footage | Pale blues, faded saturation, soft highlights |
| Damaged attic film | Low saturation, dirty yellow cast, more flicker and scratches |
Do not push every setting at once. 8mm footage can still have strong color. The goal is texture and inconsistency, not a brown filter.
Step 3: Soften Digital Sharpness
Modern video can look too crisp for an 8mm effect.
On the same adjustment layer, apply:
Effect > Blur & Sharpen > Fast Box Blur
Start with:
- Blur Radius: 0.5 to 2.0
- Repeat Edge Pixels: On
If the image becomes too soft, add:
Effect > Blur & Sharpen > Unsharp Mask
Use a low amount, around 20 to 50, to bring back a little edge detail.
This makes the image feel less digitally sharp without destroying faces, text or important details.
Step 4: Add Moving Film Grain
Grain is one of the most important parts of the 8mm look.
Create an adjustment layer called Grain.
Apply:
Effect > Noise & Grain > Add Grain
Set Viewing Mode to Final Output.
Start with a medium grain level. Super 8-style footage can handle more visible grain than a clean 35mm-inspired look.
If you prefer a simpler effect, use:
Effect > Noise & Grain > Noise
Try:
- Amount of Noise: 8% to 18%
- Use Color Noise: On for a rougher color-film look
- Use Color Noise: Off for more neutral grain
Grain Guide
| Look | Grain amount |
|---|---|
| Light 8mm influence | Low to medium |
| Classic Super 8 | Medium |
| Very old or underexposed home movie | Medium to high |
| Distressed horror footage | High, mixed with dust and flicker |
Realistic grain should move from frame to frame. Do not use one still texture stretched across a long sequence.
Step 5: Add Film Flicker
Film flicker is an uneven brightness change that suggests old exposure or projector variation.
Create an adjustment layer called Flicker.
Apply:
Effect > Color Correction > Exposure
Alt-click or Option-click the Exposure stopwatch and add:
javascriptwiggle(8,0.15)
This adds subtle exposure movement.
For a rougher 8mm effect, try:
javascriptwiggle(10,0.25)
Keep flicker controlled. Intense flashes can be distracting and may affect viewers sensitive to rapid flashing.
Step 6: Add Gate Weave
Gate weave is the small movement of a film frame inside the camera or projector.
Create a Null Object:
Layer > New > Null Object
Rename it Gate Weave.
Parent your footage and relevant adjustment layers to the null. Then alt-click or Option-click the Position stopwatch and add:
javascriptwiggle(2,1)
For a rougher result:
javascriptwiggle(4,2)
The first number controls how often the movement changes. The second controls how far it moves.
Keep this movement small. If the frame jumps too far, it becomes camera shake rather than film movement.
Step 7: Reduce Motion Smoothness
Many Super 8 cameras ran at lower frame rates than standard cinema. A reduced frame rate can make digital footage feel more like an old home movie.[youtube][nofilmschool]
Create an adjustment layer called Frame Rate.
Apply:
Effect > Time > Posterize Time
Try these settings:
| Frame rate | Suggested use |
|---|---|
| 24 fps | Cinematic motion with an 8mm-inspired texture |
| 18 fps | Common Super 8-style home-movie feeling |
| 16 fps | Rougher vintage movement |
| 12 fps | Strongly stylized, choppy or experimental effect |
Start with 18 fps. It usually gives enough stutter without making movement hard to follow.
Avoid using very low frame rates on dialogue-heavy scenes unless you want the roughness to be obvious.
Step 8: Add Dust and Dirt
Dust makes the effect feel physical.
The simplest method is a licensed dust overlay.
- Place the overlay above the footage.
- Set the blend mode to Screen, Add or Lighten.
- Lower opacity to around 10% to 35%.
- Trim or offset overlays so they do not repeat obviously.
Create Dust With Fractal Noise
If you want to create dust without stock assets:
- Add a black solid above your footage.
- Apply Fractal Noise.
- Raise Contrast heavily.
- Increase Brightness until only scattered white dots remain.
- Set the blend mode to Screen.
- Lower Opacity.
- Animate Evolution or Offset Turbulence.
Starting settings:
| Fractal Noise setting | Starting value |
|---|---|
| Contrast | 1,000 to 2,500 |
| Brightness | 300 to 1,000 |
| Scale | 30 to 150 |
| Opacity | 10% to 30% |
Use less dust than you think. A few temporary specks look more authentic than a constant storm of white dots.
Step 9: Add Scratches
Film scratches are usually thin and vertical.
Use a scratch overlay, or build one with Fractal Noise.
For a native setup:
- Duplicate your dust solid.
- Rename it Scratches.
- Turn off Uniform Scaling in Fractal Noise.
- Set the width very low.
- Set the height very high.
- Increase contrast until thin lines appear.
- Add Directional Blur at 90 degrees.
- Set the blend mode to Screen or Multiply.
- Lower opacity to 5% to 20%.
Keep scratches occasional. Make them more visible during transitions, cuts or damaged moments.
Step 10: Add Light Leaks Carefully
Light leaks can help create a Super 8 mood, but they are easy to overuse.
Use them for:
- Memory sequences
- Montage transitions
- Opening or ending shots
- Outdoor scenes
- Emotional beats
- Title reveals
Place the overlay above your footage and set it to Screen or Add. Reduce opacity until it feels like a real exposure issue rather than a color effect.
A short orange, red or yellow flare at the edge of the frame often works better than a large leak covering the whole image.
Step 11: Add a Projector Sound Layer
Audio can help sell the effect.
Try adding a subtle layer of:
- Projector hum
- Quiet film-reel noise
- Soft room tone
- Low tape hiss
- Light mechanical clicking
- Gentle vinyl crackle
Keep the effect quiet. If the projector sound is the first thing people notice, lower it.
How to Create the Look in DaVinci Resolve
DaVinci Resolve can also create a convincing 8mm look with its Edit, Color and Fusion pages.
Basic Resolve Workflow
- Add your footage to the Edit timeline.
- Crop or add a 4:3 frame.
- Use the Color page to soften contrast and adjust color.
- Add Film Grain or Noise.
- Add a vignette with a Power Window.
- Add dust, scratches or light-leak overlays on a track above.
- Use Transform keyframes for subtle gate weave.
- Apply a small exposure variation with keyframes.
- Use retiming or frame controls carefully if you want lower motion smoothness.
If you are using DaVinci Resolve Studio, its advanced film-look tools may provide extra options. But you can create an effective 8mm treatment with standard color tools, grain, overlays and subtle movement.
After Effects vs DaVinci Resolve
| Need | After Effects | DaVinci Resolve |
|---|---|---|
| Custom dust and scratches | Excellent with Fractal Noise and layer controls | Possible with overlays and Fusion |
| Gate weave | Easy with expressions | Easy with Transform keyframes |
| Detailed motion graphics | Strong | Less focused on motion graphics |
| Color grading | Good | Excellent |
| Film grain workflow | Strong with Add Grain and overlays | Strong with grain and color tools |
| Quick timeline edit | More setup required | Faster for editor-led projects |
| Reusable effect preset | Pre-compositions and presets | PowerGrades, Fusion macros and timeline presets |
Use After Effects if you want procedural control, animated graphics or custom-built texture layers.
Use DaVinci Resolve if you want to grade, edit and apply the 8mm look in one main timeline workflow.
Common Mistakes
Making It Too Dark
Old film was not always dark. Many home movies were bright, washed out and overexposed in parts.
Lift shadows slightly and let highlights bloom a little before crushing the image.
Adding Too Much Grain
Heavy grain can turn into blocky compression noise after export.
Preview at 100% scale and test the final video on a phone. If faces look muddy, reduce grain or increase export bitrate.
Using Constant Light Leaks
A light leak on every shot quickly looks artificial.
Use leaks as brief accents.
Making Frame Shake Too Strong
Gate weave is tiny. A strong shake looks like a handheld camera or an earthquake.
Use one- or two-pixel movement first.
Forgetting the Frame Shape
The 4:3 or Super 8-style frame is a major visual cue. Without it, grain and flicker may simply look like a generic vintage filter.
Copying One Reference Too Literally
Use real 8mm footage as a guide, but adapt the effect to your video. There were many film stocks, cameras, lighting conditions and home-movie styles.
8mm Look Presets
| Preset | Best for | Suggested treatment |
|---|---|---|
| Clean Super 8 | Weddings and warm lifestyle content | 4:3 frame, warm grade, medium grain, subtle flicker |
| Summer Home Movie | Travel, family and vacation edits | Warm highlights, lifted blacks, dust, gate weave, 18 fps |
| Faded Archive Reel | Historical recreations and documentaries | Low saturation, stronger grain, scratches, soft vignette |
| Haunted Home Movie | Horror and mystery scenes | Dirty color, flicker, frame stutter, heavier scratches |
| 1970s Travel Diary | Fashion, music and nostalgia edits | Yellow-green cast, grain, soft focus, occasional light leaks |
Frequently Asked Questions
How do I make digital footage look like 8mm film?
Use a 4:3 frame, medium-to-heavy moving grain, softer detail, faded or warm color, flicker, gate weave, dust, scratches and a lower frame rate such as 18 fps. Combining several subtle details creates a more believable 8mm look.[youtube][nofilmschool]
What frame rate should I use for an 8mm effect?
Try 18 fps for a classic Super 8-style look. Use 16 fps for rougher home-movie movement or 12 fps for a strongly stylized result. Super 8 cameras commonly operated at lower rates than modern video cameras.[nofilmschool]
Should I use 4:3 for an 8mm effect?
A 4:3 frame is a strong visual reference for home-movie footage and can help sell the effect. If you need a 16:9 final video, pillarbox the 4:3 image inside the wider frame.
How do I create 8mm film grain in After Effects?
Use Add Grain on an adjustment layer with Viewing Mode set to Final Output, or use Noise and grain overlays. Keep the grain moving and preview at full resolution before exporting.
How do I add dust and scratches to video?
Use licensed overlays set to Screen or Add, or make custom dust and scratches with Fractal Noise, high contrast, low opacity and animated evolution.
Can I create an 8mm look without plugins?
Yes. After Effects includes native effects such as Add Grain, Noise, Curves, Exposure, Fractal Noise, Posterize Time, Fast Box Blur and CC Vignette. DaVinci Resolve can also create the look with color adjustments, grain, overlays and keyframed movement.
Final Thoughts
A convincing 8mm look comes from controlled imperfection.
Start with the 4:3 frame. Then soften the image, add moving grain, fade the color, introduce small exposure changes and move the frame by only a pixel or two. Add dust, scratches and light leaks only where they help the story.
The result should feel personal and imperfect, not like a heavy filter placed over clean digital footage.